
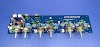
100 watts mono amplifier board using TDA7294 ic.

Spare parts
1. 1×TDA7294 ic.........https://amzn.to/2lqSEds
2. 3×22kΩ resistor 1/4W.........https://amzn.to/2lqNNce
3. 1×10kΩ resistor 1/4W.........https://amzn.to/2lTA2Db
4. 1×680Ω resistor 1/4W.........https://amzn.to/2lq9Mjx
5. 2×22uf capacitor 50/63v.........https://amzn.to/2lqaTQf
6. 2×10uf capacitor 50/63v.........https://amzn.to/2lsQBFL
7. 1×470nf capacitor 50/63v.
8. 2×100nf capacitor 50/63v.........https://amzn.to/2lqWQdc
9. 2×1000/2200uf capacitor 50/63v.........https://amzn.to/2lTPX4g
10. 4×6A4 diode.........https://amzn.to/2kl0ncA
Watch this video for better understanding

License► ©Technical Mriganka. You can't use this pcb layout for commercial purpose. You can use this pcb layout only for educational and diy projects.
*Pcb layout pdf..............https://drive.google.com/file/d/1LnWQs3yxKk9O4GDPdN9WwxXiEKEKvncg/view?usp=drivesdk
In this post I make a 100 watts mono amplifier board using TDA7294 ic. This ic is class AB amplifier [60hz-20khz]. This ic can make 100 watts output. For power supply you can use 12-0-12 to 30-0-30 volt transformer. Now follow my steps for this amplifier. First we make pcb. For make pcb you need pcb layout. download the pcb layout and print it by laser printer on photo paper. Then cut the pcb layout. Then press the pcb layout by iron on copper clad board. Press the iron 10-15 munites. Then leave the pcb for cool down 10 munites. when the pcb was cool, put the pcb in water and move the pcb layout to copper clad board. Then put the pcb in ferric chloride [FeCl3+H2O] for etching 10-15 munites. when etching was end, clean the pcb by water. Then make hole on pcb. And then press the upper side print of pcb. Now your pcb is ready mount components by instruction.
Thank you,
Thank you,
Technical Mriganka.........


1 Comments
Faiz ahmad
ReplyDelete