

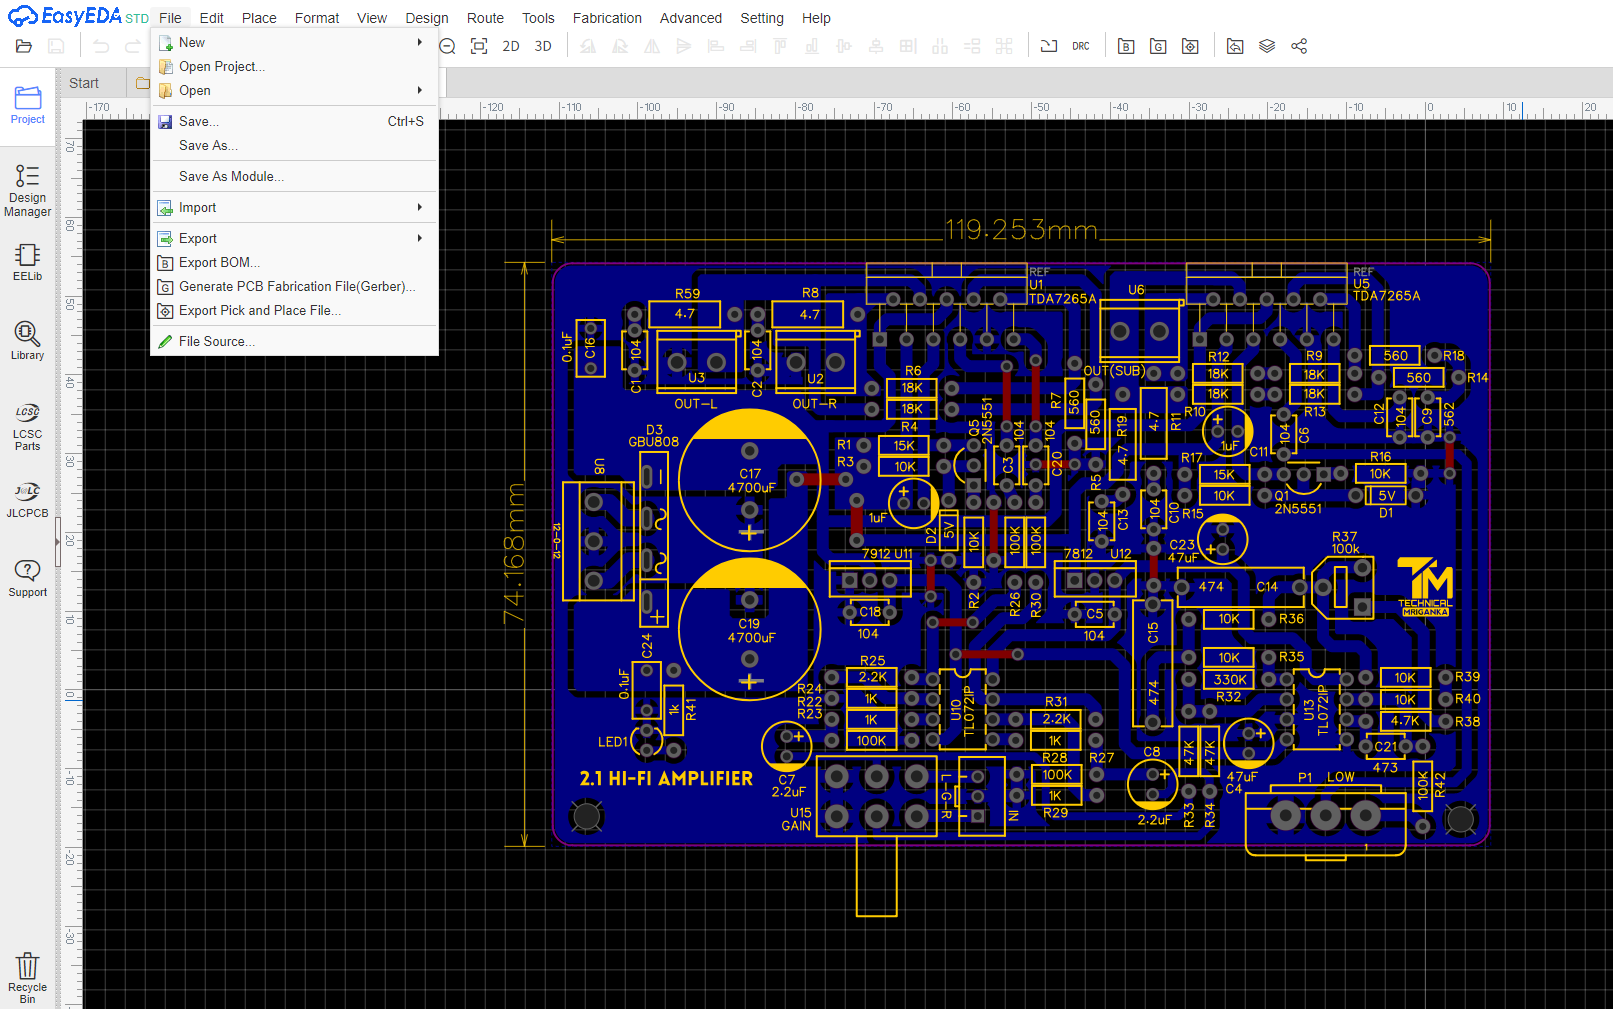
2. 2×4558D/ TL072/ TL082/ NE5532 IC.
3. 2×15KΩ resistor 1/4W.
4. 8×10KΩ resistor 1/4W.
5. 6×18KΩ resistor 1/4W.
6. 5×1KΩ resistor 1/4W.
7. 2×2.2KΩ resistor 1/4W
8. 7×100KΩ resistor 1/4W.
9. 1×330KΩ resistor 1/4W.
10. 1×4.7KΩ resistor 1/4W.
11. 4×560Ω resistor 1/4W.
12. 4×4.7Ω resistor 1/4W.
13. 1×100KΩ Preset.
14. 2×47uF capacitor 50V.
15. 2×2.2uF capacitor 50V.
16. 2×1uF capacitor 50V.
17. 2×4700uF capacitor 35V
18. 1×0.0056uF (562) capacitor 50/ 100V.
19. 1×0.047uF (473) capacitor 50/100V.
20. 2×0.47uF (474) capacitor 50/100V.
21. 12×0.1uF (104) capacitor 50/100V.
22. 2×8 pin IC base/ socket.
23. 1×7812/ 7815 + voltage regulator.
24. 1×7912/ 7915 - voltage regulator.
25. 1×Led 3 mm.
26. 1×3 pin connector Base/ Socket 2.54 mm.
27. 3×2 pin screw connector.
28. 1×3 pin screw connector.
29. 1×Dual gang potentiometer 47K/100K.
30. 1×Singe turn potentiometer 47K/100K.
31. 2×5V Zener Diode.
32. 1×GBU808/ GBU1508 Bridge Rectifier.
License:- ©Technical Mriganka. You can't use this PCB Layout and Gerber File for commercial purpose. You can use this PCB layout and Gerber file only for Educational and DIY projects.
Gerber File:- https://bit.ly/3ew7rwg
PCB Layout:- https://bit.ly/3bfhxQ2
How I make this Amplifier
For this amplifier, I choose TDA7265 IC. Which can deliver up to 25+25 Watts at 8Ω ±20V and 50 Watts at 8Ω ±20V. So here I use 2 IC for 2.1 CH amplifier. One IC for Stereo output and second IC for Bridged Subwoofer. And also I use 2 OP-AMP. One For Low pass filter and second for stereo gain booster(buffer).
Manufacturing PCB with PCBWay
For designing my PCB, I used EasyEda online software. Then I export the Gerber file (which you can download). And then I go to www.pcbway.com for manufacturing my PCB. PCBWay are the largest PCB manufacturer in China. They offer Standard PCB, Advanced PCB, Rigid-Flex PCB, SMD-Stencil and PCB Assembly Service. Here you get, 100x100mm 2 Layer PCB only at $5, And processing time within 24 hour. And they distribute, worldwide. The more you order, the less price you have to pay.

You just need to upload the Gerber File, and select the quantity, color, silkscreen, thickness etc. Then select your country, and shipping method. And then Pay.

After 7 days I have received my PCB. You can see the PCB quality, it's awesome. I have ordered White color PCB. But you can choose your PCB color. PCBWay provide total 9 color solder mask - Green, Blue, Red, Purple, Black, White, Yellow, Matte Black and Matte Green. On PCBWay you can get 100x100mm 2 Layer PCB only at $5. Maximum size PCB you can get 500x1100mm. And maximum Layer is up to 14 Layers. And If you order PCB first time at PCBWay, then you get a $5 discount coupon. So upload your Gerber today and get best quality PCB.
How To Test This Amplifier
Series light test - After complete this board don't forget to series light test. When you will on this amplifier via series light, it glow for some time (1 - 2 sec). Then series light will turned off fully. If the series light will fully turned off, then check the voltages.
Check Voltages - Check all Speaker Output and Audio Input voltage. Here you get no voltages 0.00V. If you get same voltages, then connect preamplifier to input and connect speaker to output.
Power Supply - For get best performance of this amplifier, you use 12-0-12V to 18-0-18V 5A-6A Transformer.


0 Comments